

Showing posts with label no bake. Show all posts
Showing posts with label no bake. Show all posts
Sunday, August 25, 2013
Chunky Monkey Muddy Buddies

Sunday, August 11, 2013
Cotton Candy Milkshake

Saturday, July 27, 2013
Cotton Candy Hard Candy

They were awesome flavors (watermelon and root beer) and tasted really good.
Thursday, July 25, 2013

Tuesday, July 23, 2013
Banana Split Pudding

Sunday, July 21, 2013
Peanut Butter Toffee Apples

I have braces. And, I totally completely want them to go die in a fire or something sort of hate them.
I mean, they don't exactly do wonders for my appearance.
Thursday, July 18, 2013
Cinnamon Roll Muddy Buddies

Seriously. The whole site is krispy treats! BTS, Mojito, Blueberry Muffin, Strawberry Pretzel Salad, a ton of krispy treats!
Friday, June 28, 2013
Patriotic Red Velvet Cream Cheese Muddy Buddies

This happened to me a lot during Valentines Day last year. I even talked about it on the blog. Back then my head was sort of exploding with muddy buddy ideas.
Similar to now.
I was thinking of all the possibilities, any mix, pudding, cake, cookie, and any chocolate, could make a totally different muddy buddy!
I really wanted to make red velvet ones.
I even put it in my journal. That's serious people.
But then I found out that everyone had done it. Seriously.
So I put it off for later. Yesterday I got a serious muddy buddy craving. I was gonna make something with the cinnamon chips I got, but then I got on the computer.
Oh my gosh guys! The 4th of July is next week! So I got really bored and racked my brain for ideas.
I'm good at coming up with ideas when I have a flavor. Color combos, not so much. Then, I saw this. Red Velvet Cheesecake Cupcakes, that got all jazzed up for the 4th.
Major duh moment! Just use red velvet and cream cheese. That already gives you the red and white part, all that's left is blue! Which can be easily solved with sprinkles, candy melts and food coloring.
So, I decided to make Red Velvet Cream Cheese Muddy Buddies. Perfect, who would think of muddy buddies at 4th of July?
I'll tell you who. Someone else before me! Sigh. Being a dessert blogger isn't easy.
Buuuut, I didn't want to have to change my mind after already buying the ingredients, so I just went with it.
I should go with it more often, dontcha' think?

Ashton from Something Swanky had the idea of using frosting in place of peanut butter. It has the same soft texture! Plus it gives you a lot more flavor options. So, I figured I'd do something similar.
Most cake batter muddy buddies have the cake mix added with the powdered sugar. I did that too, but for an extra flavor boost I put some in with the white chocolate. I was thinking about using a red velvet bark in place of white chocolate and then thought, why not just put some cake mix in with the frosting goop?
It makes it look sort of pink, but it doesn't really matter because it all get's covered up with cake mix and powdered sugar.
Frosting muddy buddies have a different texture/flavor than normal ones. They're really sweet, I'd probably add a pinch of salt next time, and they're really soft. Normal ones are crunchy/soft. These ones are soft. These are chewier in a way. It's like chewy and soft got morphed together. I like normal muddy buddies when they're still warm, but these ones tasted a lot better the next day. The flavors blend and complement each other better, and it's crunchier, but with a soft texture. It's kind of hard to describe, but it's cool.
Really cool.

Muddy buddies get a new twist in this delicious patriotic treat! In place of peanut butter is cream cheese frosting, which then get's smothered in a red velvet powdered sugar mixture. The result is a soft sweet treat that you can't resist!
Prep Time: 10 min. Total Time:10 min. Serves: 6
Ingredients:
- 4 1/3 cup chex cereal
- 1/2 cup white chocolate
- 2 tablespoon butter
- 1/4 cup cream cheese frosting
- 1 teaspoon vanilla
- 1/2 teaspoon red velvet cake mix
- 1/2 cup red velvet cake mix
- 1/2 cup powdered sugar
- Measure the chex and pour into a large bowl.
- Microwave white chocolate, butter, and frosting. Take out and stir about every 20 seconds. After 1 minute, add vanilla and 1/2 tsp red velvet cake mix. Stir, and microwave until smooth.
- Pour frosting mixture over the cereal. Mix it until coated in the mixture.
- Pour powdered sugar and 1/2 cup cake mix into a gallon size zip-loc bag. Seal and shake together until mixed.
- Use a large spoon to scoop the cereal into the bag. Seal the bag and shake until coated.
- Serve. This is good at any stage, but I prefer it the next day when the flavors sort of blend and it get's crunchier.
*if you want the patriotic version of this, follow all of the directions. Divide the muddy buddies in half and add a lot more powdered sugar to one. This will make it white. Roughly toss the white and the red together, then drizzle with blue candy melts
*you really just need 1/2 cup cake mix, and 1/2 tsp cake mix. There really is only 7 ingredients, not 8, I just added that for clarification.
*these are really sweet, you can add a pinch of salt to the white chocolate to tone it down a little
*I used canned frosting because it's a little smoother and easier to melt, but you can use homemade if you want.

These muddy buddies are different than the original. I like them both equally, but in different ways.
The red velvet has almost a salty/sweet taste because sometimes the cream cheese shines through.
The original is crunchier, but the red velvet is chewier/softer. It literally melts in your mouth. They both have a lot going for them, and I really recommend trying this version, it's super yummy.
So, I have 2 title photos. They just both looked so good! Feel free to pin either one (or both, or all of them, I'm good!)

Wednesday, June 26, 2013
White Chocolate Toffee Doodle Pudding Mousse

I always knew about it, I just didn't know what to call it.
Ashton from Something Swanky coined the term.
What it is is a mixture of cool whip & pudding that has a light and fluffy texture, similar to a mousse.
Only pudding mousse is way waaaaaaay better. For one thing, it is so ridiculously simple, essentially it's only 3 ingredients. And there are so many different flavor combinations. You can take any pudding, any milk, any add-ins, any cake mix and make a totally new dessert!
So, this sort of inspired by these White Chocolate Toffee-Doodles. Don't they sound yummy? I love doodle anything, cocodoodles, snickerdoodles, pumperdoodles, and now toffeedoodles.
I had a box of white chocolate pudding laying around, but I didn't know what to do with it. When I saw those cookies, my mind jumped to that pudding. Except for I didn't have toffee.
My dad took me to the store to buy ingredients (he paid for them, awesome right?) and I made a bee-line for the baking isle. By the way, in case you were wondering, baking stuff is in a totally different isle than the candy section. I spent a long time aimlessly wandering around looking for cinnamon chips.
Anyways, these were so worth the wait. It was amazing! It was really easy and tasted super good. It was creamy and tasted just like a mousse, you couldn't tell a difference in texture at all. The flavor was awesome too, just like a snickerdoodle with a hint of white chocolate flavor.
The only downside was the toffee bits. Now, don't worry, they were fantastic and tasted all toffee-ish and caramelly, but I had just gotten my wires for my braces switched. Quite violently in fact. (P.S, it involved lasers and buttons) My teeth were really sore, and the toffee was like a bittersweet ending, awesome flavor, but crunching it killed me.
This doesn't mean sugar hurts your teeth. Because carrots hurt it too. Just putting it out there for any dentists, moms or sugar haters (you guys are crazy, who can hate sugar? Or this?)

And easy and crunchy and snickerdoodley and creamy and fluffy and just make the darn mousse!

This dessert is light and fluffy, and so simple! It's packed with snickerdoodle flavor, with crunchy bites of toffee in between, heaven!
Ingredients:
- 1 small package of white chocolate instant pudding mix
- 1 1/4 c. milk
- 8 oz. tub of cool whip
- 2 tsp. cinnamon
- 1 1/2 tbsp. flour
- pinch of cream of tartar (see notes)
- 3-5 tablespoons toffee
- Whisk together the milk and pudding mix until thick.
- Whisk in cool whip. Use a rubber spatula to make sure all of the pudding from the bottom of the bowl has been incorporated.
- Whisk in the cinnamon, flour and cool whip.
- Stir in toffee. Chill if desired, or serve immediately.
*you only want a tiny amount of cream of tartar, if you add just a little too much it will ruin the whole thing with a sour/bitter taste. Add about 1/16 of a teaspoon, just get a 1/4 teaspoon and add a fraction of it, you really don't need too much because it has a strong flavor.
*you can add more or less toffee until it gets to what you want
*you want room temperature cool whip, or just cool whip with a normal consistency. Do not microwave frozen cool whip, it can turn out really bad. If you do, take it out every couple of seconds and stir it, watch it really carefully.
*this will stay good in a fridge for about 2-3 days if covered. If you got spit in it (eew) by double dipping, etc., then it will only be good 1 day.
Adapted from Something Swanky

We watched some little girls the day I made it. They were awesome photo helpers!

They held up the blanket and held spoons for a couple of pictures.
Although I've never had such a wiggly background, it was fun to have others than my family like what I made.
And if you can't tell, the pudding mousse made them smile.
And if you make it, I'm pretty sure you'll smile too.

Monday, June 24, 2013
Cotton Candy Watermelon


So, ready for a story?
I got my braces on in December, right before Christmas (worst present I've ever had). It hurt SO bad! The pain was awful, I couldn't chew anything, and my teeth constantly hurt and I was getting headaches. It lasted for about a week or two.
Then I got them re-tightened. I thought it would be like last time, super horrible. It hurt, but not as much as before, and it only lasted three or four days.
I went in a couple months later to get them re-tightened. I had a faulty hygienist and I had a huge wire poking out. I couldn't feel it then, but an hour later it was driving me crazy. It cut into my lip reeeeeally bad, it was a bloody mass of lip tissue, really gross, and really painful. I had to wear wax 24/7. Wax is horrible, it's a whole 'nother post. My teeth started to adjust and it went away, then they adjusted more and it came back, switched again and it was gone.
Now, today. I went in and expected it to be like the other two, short and
So we tried the lip retractor five times, then tried a smaller one. It was too small, so she had to use some weird little pad things with her hands. Then she stuck some medicine stuck to cotton swabs in my gums.
A while ago they pulled out my canine teeth. They weren't ready to come out. Now they're trying to force the permanent ones out. I think it's
So she stuck it in my two canine gum holes. I hated it, it didn't feel good, all I wanted was that out of my mouth.
Then the dentist/doctor came over. He started talking about a laser. I repeat, he was talking about a LASER. Freak out! He said something like, "I hope you're not too scared for the laser". Like I knew about it in advance. I didn't, they never told us. Anyways, he brought this laser over that had smoke coming out of it (double freak out!!!) and started digging it around in my gum. I couldn't feel it that much, but I didn't like it. I'm pretty sure red hot fire lasers were never meant to be in my gums. EVER.
Then they tried to put some "button" on. I had no idea what they were doing, I just wanted to go home. When I looked at it at home it looks like they stuck an invisible hook/string in the gum hole (that they made with the laser) and then brought that up and stuck it up on the top high part of my gums.
Ouch.
Okay, enough about lasers and hooks and teeth, lets talk about this.

My little sister got watermelon, and I got her some cotton candy. The cotton candy fell into the watermelon, and started melting. I tasted it and . . .
It was amazing! So awesome, I loved it and did it with the rest of her watermelon. I recreated it at home as soon as I could, yesterday, but . . .
I had just gone to the orthodontist (aka the laser fanatics), so my teeth were suuuuper sore. I tried to bite into a watermelon during the photo shoot to make it look cool and I just about died. So, while I didn't really eat this, I've had it before, and it rocked.
But what I did eat was some of the cotton candy with watermelon juice. Ohmygosh it was so good! So yummy, totally doing this again and again.
What this is is watermelon cubes. You smoosh the cotton candy into the top and it starts melting and oozing into the watermelon. Then you add another piece on top. This one might melt a little, but not that much.
That's it! Then you eat it and it's awesome and the end.

Watermelon oozing with melted cotton candy, with another fluffy piece on top!
Ingredients:
- watermelon
- cotton candy
- Cut the watermelon into cubes.
- Pull off a piece of the cotton candy that is about half the size of the cube, you don't have to be exact, any amount is fine. Press that into the top and push down. It will start melting. When there is only a little bit left, stop.
- Grab another tuft and stick it on top. Eat!

So, I love this, because it's super delicious, and it's easy. If you know me, that's a staple, if it's too hard, I totally quit. That's kind of why I love cake mix so much.
This would be great for the 4th of July, or any time! Have fun creating!

Wednesday, May 22, 2013
Funfetti Puffy Bar Cakes

I've been really busy lately and barely have time for anything. So what do you do when you have no time for an oven but need to kick that funfetti craving?
You make puffy bar cakes.
Simple, buttery, airy, puffy bar cakes.
I decided I really need to re-do this recipe because the first instructions weren't very good. The need for some modifications was the perfect opportunity to make a cake batter version.
And yes, this is totally my favorite version by far. Better than the original and red velvet one combined.
With only a few ingredients, and only a few seconds, there's no reason not to make these!
Funfetti Cake Batter Puffy Bar Cakes
A puffy airy bar that's a cross between a brownie and a cake, this funfetti version will win your heart over for sure!
Prep Time: 1 min. Cook Time: 2 min. Total Time: 3 min.
Ingredients:
- 1/2 cake mix
- 1 egg
- 1/4 cup of butter (1/2 stick)
- Combine ingredients until dough like consistency.
- Scoop into small balls, like half the size of a cookie dough ball.
- Put on a microwave safe plate. These spread a lot, so space them accordingly. Cook in the microwave from 30 seconds - 2 minutes.
- Check them periodically, they're done when the outsides look crisp and there's only the tiniest bit of dough in the middle. Let cool, then serve.
Let's move on to the credits!
I edited some photos by Spill The Beans. I made them say funfetti puffy bar cakes at the bottom for my own purposes. This post is just a shout out to Sheila and her delicious Frozen Funfetti Bars, which will be made around these parts soon. Like ASAP. Thanks for the delicious recipe Sheila! Everyone, go check it out! Because this post is all about Sheila! Because while it looks like it's about a super easy (not to mention delicious) hybrid of cake and brownie that tastes like cake batter, it's really all about honoring our fellow blogger and friend Sheila. Keep up the good work Shiela! You are a great example of blogging and I just wanted to dedicate this post to you. That is why I wrote this post. I just wrote about the puffy bar cake for fun, because really, this is all about you. This post is for you. The puffy bar cake is just a nice little addition, like a present for you. The whole purpose of me writing this is to honor you. Not the puffy bar cake. Because this is all about you. The whole reason of my blog is so I can honor bloggers like you. I do the recipes just to attract people here so they can see what a truly amazing personality you have. I hope you aren't angry that I edited your photos. The only reason I did it is so that I can compare the differences between our recipes and show that even though we're different, we're both awesome. Again, I hope you're not angry that I honored you like this. That is why I edited your photo, to honor you and show how cool you are. I hope I can grow up and make as many cool things as you.Once again, if you are offended by me editing your photos, well think of it like this. This is just a shout out to you, like many bloggers do with their friends at the bottom of their posts.
You guys should know by now what's coming. Before & After Time!
Here's Sheila's
 It's a beautiful photo to start with, but let's see what I did with it.
Here's the final product!
Go say hi to Sheila, and make these bar cakes!
Tuesday, May 21, 2013
Birthday Cake Soda Float

Not this year. Oh no, I've never been so relieved for summer to come.
This year my birthday is the day before the last day of school. Last year it was the last day of school.
Only that week was horrible because I got sick with the worst sickness I'd ever had.
It was like a combination of strep throat and something else I can't remember (maybe the flu?), so I was double sick. It was awful having to miss the last week when we had tons of fun.
I missed yearbook signing, field day, a fun assembly/pep rally, and lots of other stuff too. I finally came on the last day of school. I wasn't really better, still kind of weak, but no way was I going to miss everything.
I came to school and got my yearbook and a cash reward for being the outstanding reader of the grade. It was tons of fun, but I'll always remember the talent show.
The talent show was cool. One of the acts that I LOVED was this one. But the one that's the most memorable was when the fire alarm went off.
Some girls were dancing to Domino (they were super talented by the way), and when they were dropping to do the splits the fire alarm goes off. The funniest part was the total look of confusion on their faces, and everyone elses! We were all wondering if this was planned or what, they wouldn't have a fire drill in the talent show so it was probably real.
Anyways we went outside and then came back in and the girls had to start all over. I feel kind of bad for them because everyone was too rowdy thinking about the surprise drill to really watch the dance.
Anyways, I don't know what that has to do with this, but this is hands-down THE BEST ice cream float I've EVER had. Seriously.
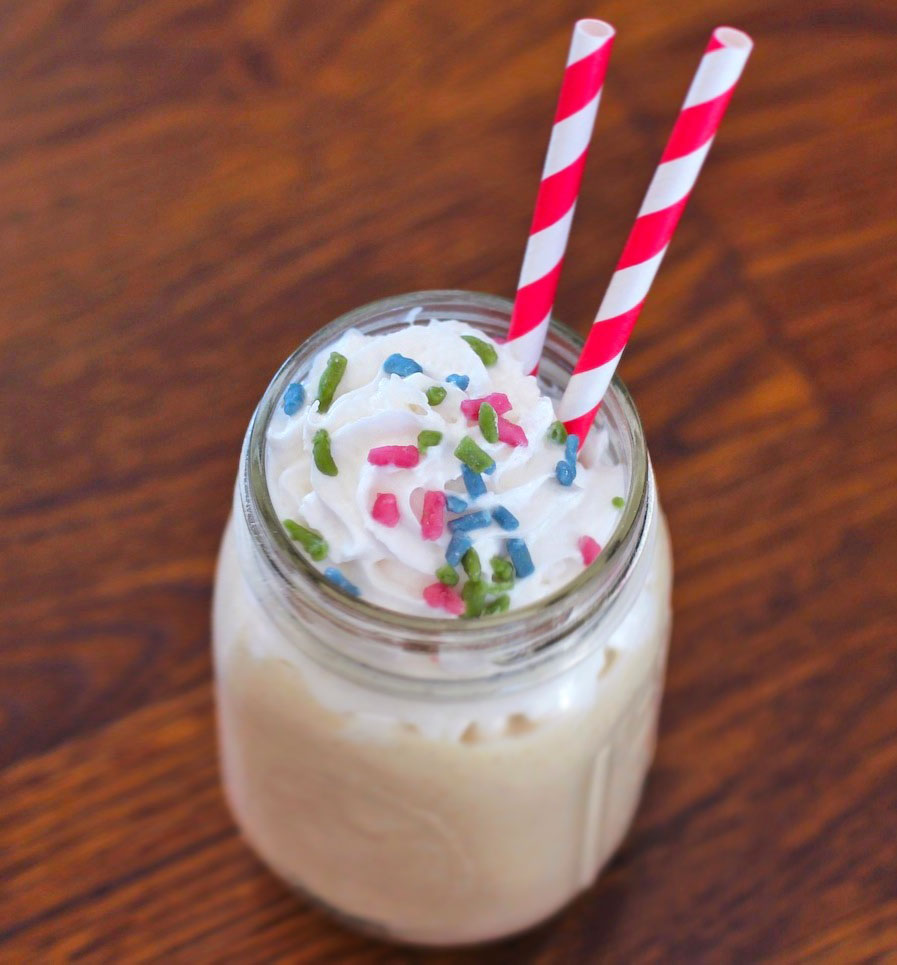
Birthday Cake Soda Float
Vanilla soda with birthday cake ice cream.
Ingredients:
- vanilla soda
- birthday cake ice cream
- sprinkles
- Scoop ice cream into glass.
- Add soda.
- Garnish with sprinkles and serve.
I came up with this on the bus when I was on the bus half listening to my friend (I know, I'm a bad friend) And it is awesome!
I was trying to think of how you could have different flavors of floats. I kept thinking of soda flavors and then it hit me.
Ice cream! Any ice cream paired with the right soda creates a whole new flavor of ice cream floats! There are limitless possibilites.
I used Kroger Deluxe Birthday Cake Ice Cream. I've talked about how awesome it is before. Seriously, best ice cream ever. And then I used Shasta for the soda. I like them the best because I'm always 100% sure that there's no caffeine. Plus they have awesome flavors. But you can use any vanilla soda, vanilla coke, vanilla creme, as long as it's got vanilla, you're good!
I've done it again guys, merging photos. I think you'll see this more and more often because I like how it makes it look like a totally different photo, and I can tailor it to make it look a lot more like what I made, and what you can expect when you make it.
I merged some photos from Desserts with Benefits with pictures from Fast Drink Recipes. I made them say Birthday Cake Float at the bottom for my own purposes. This post is just a shout out to both websites. They're both really great ones in fact, with great cake batter drinks. Fast Drink Recipes had a cake batter protein shake (have got to get this to my mom! healthy + cake batter = best compromise ever!) and Jessica made a Cake Batter Smoothie. Both are healthy! Score!! Thanks for the delicious recipe guys! Everyone, go check them out! While it looks like it's about one of my best ideas eeeeeeever, it's really all about honoring our fellow bloggers and friends Jessica and Admin. Keep up the good work you two! You guys are great examples of blogging and I just wanted to dedicate this post to you. That is why I wrote this post. I just wrote about the float for fun, because really, this is all about you. This post is for you. The float is just a nice little addition, like a present for you. The whole purpose of me writing this is to honor you. Not the float. Because this is all about you. The whole reason of my blog is so I can honor bloggers like you. I do the recipes just to attract people here so they can see what a truly amazing personality you have. I hope you aren't angry that I edited your photos. The only reason I did it is so that I can compare the differences between our recipes and show that even though we're different, we're both awesome. Again, I hope you're not angry that I honored you like this. That is why I edited your photo, to honor you and show how cool you are. I hope I can grow up and make as many cool things as you.Once again, if you are offended by me editing your photos, well think of it like this. This is just a shout out to you, like many bloggers do with their friends at the bottom of their posts.
Here's my "recipe" of sorts.
+

+ awesome blogger/secret baker and Picmonkey
=
Bye lovelies!
Friday, May 17, 2013
Gooey Butter Cake Milkshake

The actual cake turned out fine, it was totally delicious! But my hair got stuck in the KitchenAid, if you want the full story, go here.
Anyways, I learned from that.
1. Gooey Butter Cakes rock and are not as intimidating as they seem.
2. Always have hair in a ponytail when cooking.
3. Always bake cookies for less time than called for. Always bake bars for more time than called for.
4. Let things set up.
Gooey butter cake is super scrumptious. I made it a while ago, but didn't make it for a reeeaaaaallly long time because it's super rich, and I always eat tons of dessert, rich or not. As a result, my tummy wasn't too happy. It takes a lot more time to bake than other things I usually make, like dips, pies or cookies. And also there was that traumatic experience.
This milkshake has actual gooey butter cake in it, along with some cake mix and cream cheese frosting, so it's packed with flavor. I just used a cake that I'd made a couple days leftover (I
Anyways, you really should try this milkshake, it's awesome!
Gooey Butter Cake Milkshake
A milkshake with packed with gooey butter cake flavor from slices of cake, cake mix and frosting.
Serves: 1 Total Time: 5 minutes
Ingredients:
- 4 scoops Vanilla Ice Cream
- about 1/2 cup (3-4 slices)of gooey butter cake
- 1/4 cup milk
- 1/2 cup yellow cake mix
- 1/3 cup cream cheese frosting (I used canned)
- 1/4 cup powdered sugar
- In a blender combine all ingredients. Blend until smooth, and serve.
Adapted from The Novice Chef
I'm super busy (as usual) so let's just go straight to the credit.
I edited some photos by Be Splendid. I made them say gooey butter cake milkshake at the bottom for my own purposes. This post is just a shout out to Boya and her delicious Banana Milkshake. Thanks for the delicious recipe Boya! Everyone, go check it out! Because this post is all about Boya! Because while it looks like it's about the newest milkshake in town , it's really all about honoring our fellow blogger and friend Boya. Keep up the good work Boya! You are a great example of blogging and I just wanted to dedicate this post to you. That is why I wrote this post. I just wrote about the milkshake for fun, because really, this is all about you. This post is for you. The milkshake is just a nice little addition, like a present for you. The whole purpose of me writing this is to honor you. Not the milkshake. Because this is all about you. The whole reason of my blog is so I can honor bloggers like you. I do the recipes just to attract people here so they can see what a truly amazing personality you have. I hope you aren't angry that I edited your photos. The only reason I did it is so that I can compare the differences between our recipes and show that even though we're different, we're both awesome. Again, I hope you're not angry that I honored you like this. That is why I edited your photo, to honor you and show how cool you are. I hope I can grow up and make as many cool things as you.Once again, if you are offended by me editing your photos, well think of it like this. This is just a shout out to you, like many bloggers do with their friends at the bottom of their posts.
It's Before & After time!
Here's Boya's

And mine
Mine is more yellow and has a slice of gooey butter cake on the glass. And guess what I just noticed! This isn't really Boya's recipe! She was just sharing something from The Kitchnn! Just like I'm sharing her blog! We must think alike!
Thursday, May 9, 2013
Root Beer Muddy Buddies

Are you ready?
I don't like soda that much.
It's just too fizzy and sweet, and it makes me burp and hiccup. And hiccups are like the black plague. Seriously. And when I burp, I burp loud. Which is sort of rude and embarrassing, not to mention that I can sort of feel the root beer gas coming through my nose. Gross.
But, I do like some sodas. Hope is still there!
Want to know the sodas I like?
There's two. And I'm super picky about one of them.
They are . . . (drumroll please) tiki punch and orange soda.
Tiki punch is made by the Shasta company. It's basically carbonated fruit punch, and I LOVE it! It's super yummy, I'd almost go as far to say that I'm addicted.
I'm very picky about my orange soda. No Fanta or Sunkist, I only like the kind found in WalMart. And it cannot be the Walmart Great Value brand (do they even make soda?). Just a normal boring kind from Walmart. Or the Dollar Store.
That being said, I'm not a huge fan of root beer. But one way that I like root beer?
Muddy buddy form.
Root Beer Muddy Buddies
Muddy buddies that taste just like root beer.
Serving: 10 Prep Time: 10 min. Total Time: 10 min.
Ingredients:
- 9 cups Rice Chex Cereal
- 1 cup white melting chocolate
- 1/2 cup Duncan Hines Frosting Creations frosting
- 1 teaspoon root beer extract
- 1/2 teaspoon root beer
- 1 teaspoon vanilla
- 1 1/2 cup powdered sugar
- Add root beer and extract to frosting. Mix until totally combined
- In a large mixing bowl, microwave the white chocolate and the frosting for 1 minute, add the vanilla. Mix together until smooth.
- Pour the cereal and chocolate mixture into the bowl, and use a large rubber spatula to mix the cereal until it's coated in the chocolate mixture.
- Pour the powdered sugar into a gallon sized zip top bag. Use a large spoon (or whatever method works for you) to scoop the cereal into the bag. Seal the bag and shake until the cereal is coated in the powdered mixture.
Hugely Adapted from Something Swanky
This is super good, and not to mention easy! It reminds me of a root beer float that didn't get enough ice cream, which always bugs me, but in muddy buddy form it's actually pretty good!
I edited some photos by Two Peas and Their Pod. I made them say root beer muddy buddies at the bottom for my own purposes. This post is just a shout out to Maria and her delicious Chocolate Coconut Chex Mix. Thanks for the delicious recipe Maria! Everyone, go check it out! Because this post is all about Maria! Because while it looks like it's about the newest version of muddy buddies , it's really all about honoring our fellow blogger and friend Maria. Keep up the good work Maria! You are a great example of blogging and I just wanted to dedicate this post to you. That is why I wrote this post. I just wrote about the muddy buddies for fun, because really, this is all about you. This post is for you. The sauce is just a nice little addition, like a present for you. The whole purpose of me writing this is to honor you. Not the muddy buddies. Because this is all about you. The whole reason of my blog is so I can honor bloggers like you. I do the recipes just to attract people here so they can see what a truly amazing personality you have. I hope you aren't angry that I edited your photos. The only reason I did it is so that I can compare the differences between our recipes and show that even though we're different, we're both awesome. Again, I hope you're not angry that I honored you like this. That is why I edited your photo, to honor you and show how cool you are. I hope I can grow up and make as many cool things as you.Once again, if you are offended by me editing your photos, well think of it like this. This is just a shout out to you, like many bloggers do with their friends at the bottom of their posts.
Now here's a question: What time is it? Before & After Time!
Here's Maria's

and mine
Wednesday, May 8, 2013
Homemade Tigger Tail Pops (Disney Copycat) Tutorial

I can remember not very long ago (like, two months ago) secretly toasting marshmallows over the stove while everyone else was watching a movie.
Ah, my guilty pleasures.
I have a lot, way too numerous to list here, so instead, let's take a really short trip down memory lane.
Do you guys remember my Tigger Tail Ice Cream?
I really need to remake it, but oh well. That was ice cream based on tigger tails from Disneyland.
Apparently, there's lots of restaurants at Disneyland. More than I can count.
There's one called Pooh's Corner. They sell lots of cutesy little things there, like mickey mouse candy apples, and my favorite, tigger tail pops.
It's four marshmallows covered with caramel, which is then coated in orange and black candy melts. Yum. So if you were to make something tigger tail flavored, it would be white chocolate, caramel and marshmallow. Killer combination.
Unfortunately, I have never been to Disneyland, so I've never tried these delicious things. But I found a way to make them at home by following this awesome tutorial by Christi.
I'm a super visual person, and I always love it when people do step by step tutorials, so I did one for you guys! All of these are Christi's photos unless specified otherwise.
Tigger Tail Pops
You will need: sticks (not like twigs, like lollipop sticks or toothpick type things), marshmallows, microwave safe caramel, two tablespoons of water, wax paper, cooking spray, white chocolate
1. Put three or four marshmallows on the stick.

2. Put caramel bits into a microwave safe bowl with two tablespoons of water.

3. Put it in for about a minute and thirty seconds, it depends on your microwave, you just want to get it melted.

4. Spray wax paper with cooking spray. A LOT of cooking spray, or else you will be stuck scraping caramel off for eternity. There are times like these when I wish I had a silpat (if you have one TOTALLY use that in place of the wax paper! it will make your life a lot easier)

Remember, you need a lot of cooking spray, or this will happen.

5. The caramel is pretty sticky. I found that mine was too sticky, so I added more water and put it back in the microwave. Even so, it's really hard to dip the pops in it, so brush it on with your pastry brush.

Putting the pastry brush in hot water helps to make the caramel spread smoother.
6. Now you just let them set up. I'm super impatient and stuck them in the freezer, and that sped it along quite nicely. You don't want it to be hard though, just nice and firm.

7. Once it sets up, you have to pull it off. If your marshmallows are sticking to the paper and looking like this
 then you want to put it in the fridge until it comes off like this.
8. Then you dip them in orange candy melts, which pretty much tastes like white chocolate. (This picture comes from Rogers Neighborhood)

9. Then drizzle dark chocolate on top in stripes. So then it will look just like something from disneyland! (this photo was actually taken from a disneyland one, and it's from the Disney Food Blog
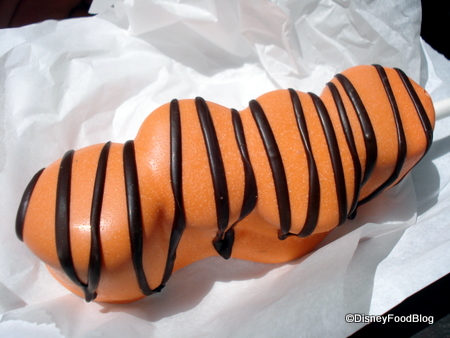
Now bite into it, mmm look at all that goodness.
I edited some photos by The Disney Food Blog. I made them say Disneyland Copycat Tigger Tail Pops at the top for my own purposes. This post is just a shout out to AJ and AJ's awesome clarification between tigger tails and tiger tails. Thanks for the clarification Aj! Everyone, go check it out! Because this post is all about AJ! Because while it looks like it's about how to make some of the most delicious treats ever known to mankind (seriously, there's white chocolate caramel and marshmallow all in one) , it's really all about honoring our fellow blogger and friend AJ. Keep up the good work AJ! You are a great example of blogging and I just wanted to dedicate this post to you. That is why I wrote this post. I just wrote about the tigger tails for fun, because really, this is all about you. This post is for you. The tigger tails are just a nice little addition, like a present for you. The whole purpose of me writing this is to honor you. Not the tigger tails. Because this is all about you. The whole reason of my blog is so I can honor bloggers like you. I do the recipes just to attract people here so they can see what a truly amazing personality you have. I hope you aren't angry that I edited your photos. The only reason I did it is so that I can compare the differences between our recipes and show that even though we're different, we're both awesome. Again, I hope you're not angry that I honored you like this. That is why I edited your photo, to honor you and show how cool you are. I hope I can grow up and make as many cool things as you.Once again, if you are offended by me editing your photos, well think of it like this. This is just a shout out to you, like many bloggers do with their friends at the bottom of their posts.
You guys know what time it is, right? No? Seriously? Well, it's before and after time!
Here's AJ's

and mine
Anyways, I totally love this new flavor, and you can definitely expect some tigger tail stuff coming up!
Subscribe to:
Posts (Atom)
